Check out the guide below to see everything you need to try it out for yourself!
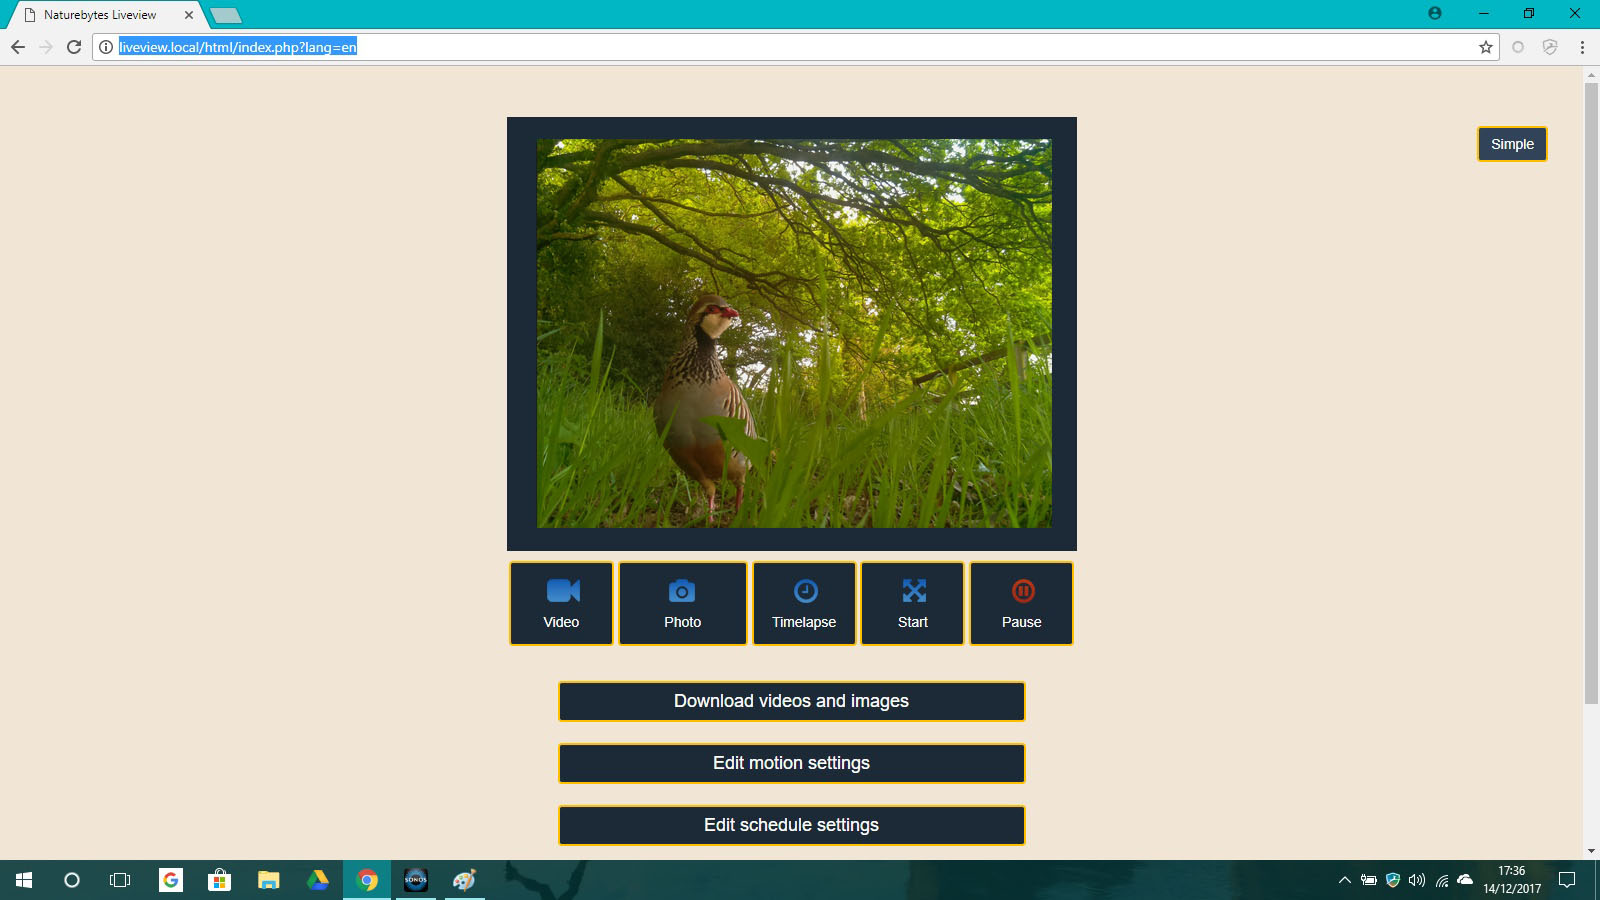
Once you’ve added adapters and a long ethernet cable you’ll be able to watch the view from your camera in real-time and use the interface to record videos, take photographs / snapshots and set motion-detection and change settings all from the comfort of your computer indoors.
Below I’ve added a guide and a list of parts you’ll need with suggestions of where you can find them and how much they’ll cost. This is a hack so it’s not necessarily the most beautiful but it does work wonderfully well!
Additional hardware you’ll need:
- Wildlife Cam Kit or Raspberry Pi and camera set up
- microSD Card with Live view operating software image – download here – this will run on your Raspberry Pi and provide an interface to view and control your camera settings.
- Power Over Ethernet Adapter Kit (Amazon – £19.99)
- Ethernet cable (cat5e with RJ45 connector) – the length that you need to run from your camera location to your computer (15 m cable gearbest – £3.76)
- DC Barrel to Micro USB adapter (thepihut £2)
- USB to ethernet adapter (only required f you have Raspberry Pi A+/Wildlife Cam Kit. Pi B/B+/2/3 models do not need this) – Connects USB to RJ45 Ethernet, compatible with windows, linux (Amazon– £4)
- microSD writer (your computer might have one of these already, or you might need to purchase a card adapter £3.50 or a USB micro SD writer £3.99)
- 20mm Grommet: You can either; purchase a grommet to run the power like this; pierce a hole in your grommet and feed the cable through, or; hack another solution to give the hole some weather protection using sugru, blue-tac or something similar.
Estimated Cost of additional hardware needed – £30.00
note: We do not supply the additional parts. The additional purchase parts (linked above) are our suggestions that have worked well for us. Feel free to hack your own solution and let us know how you get on.
Steps to create a live-stream from your Wildlife Cam Kit.
On your laptop or desktop;
1. First, you’ll need to download and install the “Bonjour” software package for Windows (if using Mac you don’t need to) – this software allows the Raspberry Pi to talk to your computer when plugged in via the ethernet connection.
2. Next, download and install the Chrome browser. Naturebytes Live View has been optimised to work in Chrome and doesn’t support Internet Explorer.
3. Download the Naturebytes Live View Image (powered by the excellent RPi-Cam-Web-Interface) and write it to your microSD card to be used in the Raspberry Pi (for more detailed instructions on how to do this see here.)
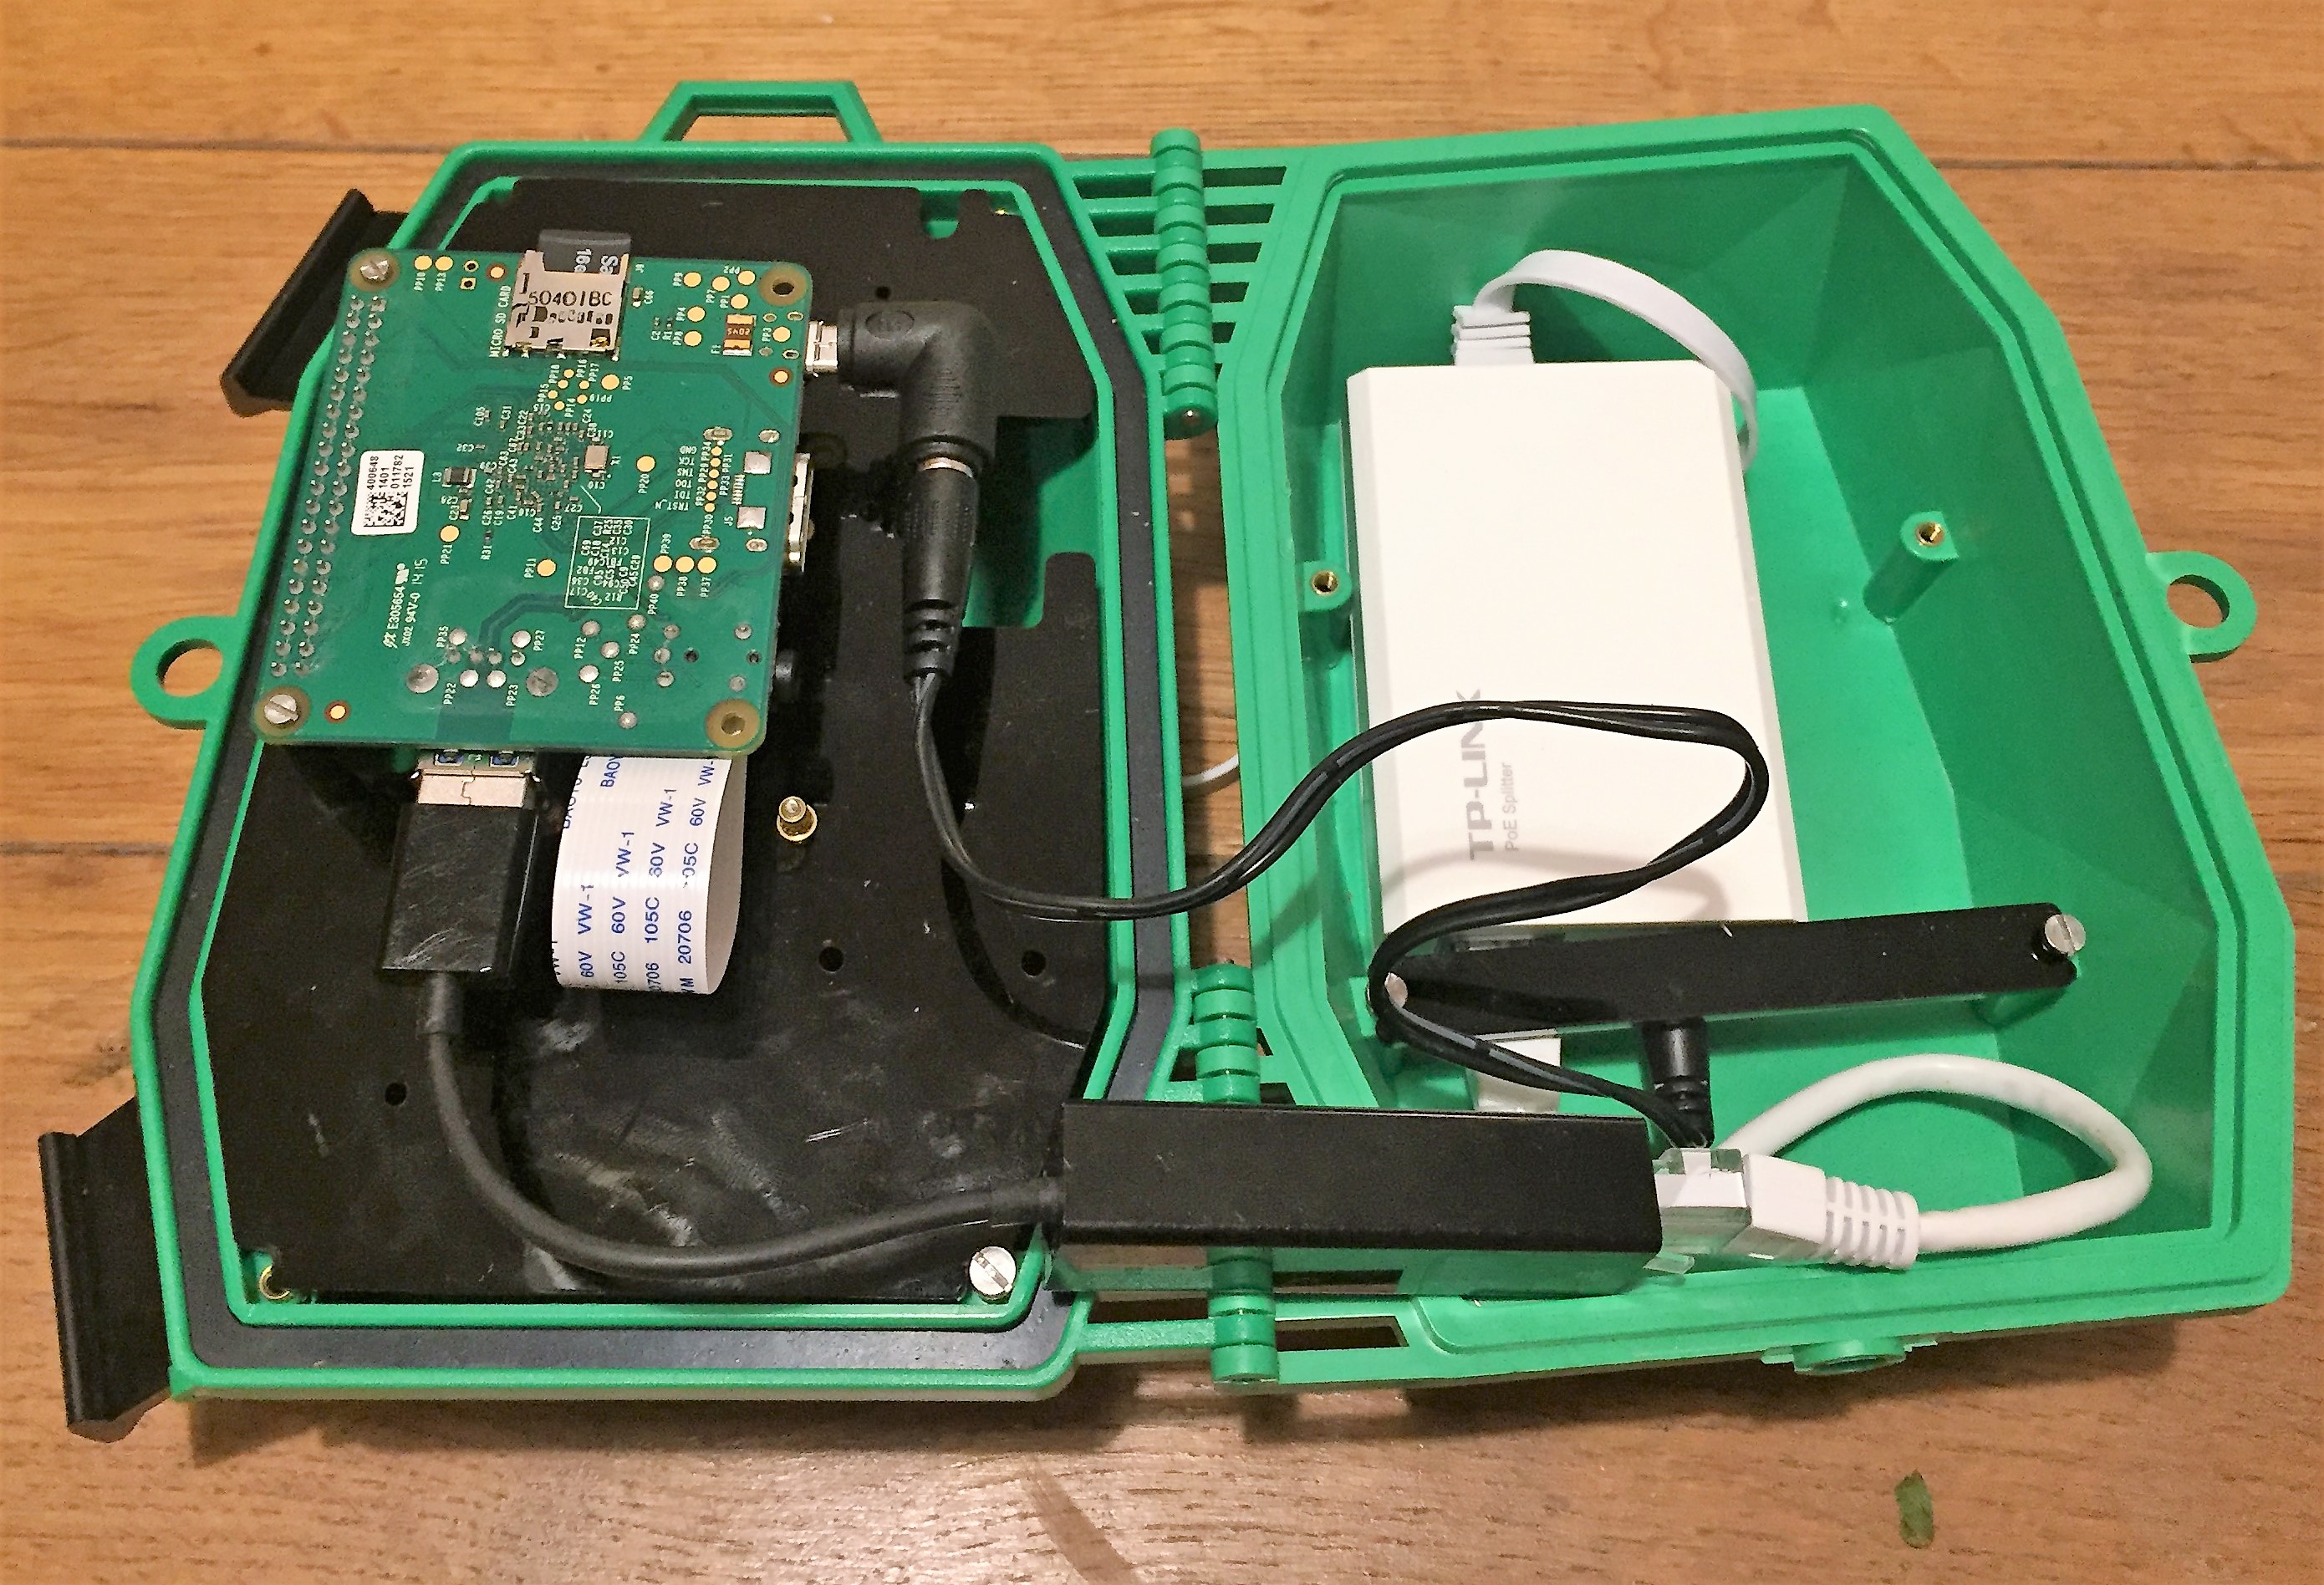
4. Connect up your PoE adapter kit to your computer, PoE splitter, Injector and Raspberry Pi so they are all connected. Instructions are included in the PoE adapter kit but we’ve included additional instructions below for guidance;
i) Connect the PoE Splitter to the Raspberry Pi:
Insert the PoE kit DC Power Cable into the DC OUT port of the Splitter, insert the other end into the corresponding DC port of the DC Barrel to micro USB adapter and connect it to the Raspberry Pi.
Note – The black switch on the PoE ‘Splitter’ should always be on ‘5V’.
ii) Connect one of the PoE kit’s short ethernet cables from the LAN OUT port of the ‘Splitter’ to the Raspberry Pi unit with the USB to ethernet adapter.
iii) Place the PoE ‘Splitter’ inside the back of the cam kit and run the ethernet cable through the back of the cam kit through the opening.
Note – this will mean water can get through the back of your case so you don’t want to leave it out where dust or water can get inside. You can either purchase a grommet like this, or pierce a hole in your grommet and feed the cable through, or hack another solution to give the hole some protection using sugru, blue-tac or something similar.
iv) You’re now ready to connect the Wildlife Cam Kit to your computer! Insert the short Ethernet Cable into the ‘LAN IN’ port of the PoE Injector, and connect the other end of the cable to your PC (hub or router to enable multiple Ethernet connections)
v) Connect your long Ethernet Cable from the PoE ‘POWER+DATA IN’ port of the Splitter to the Injector’s ‘POWER+DATA OUT’ port.
5. Ensure the microSD card with Live View software is inserted into the Raspberry Pi. Connect the Power Adapter with the PoE Injector and plug into an electrical outlet. A green light on the PoE “injector” unit will indicate the power is on.
Your Raspberry Pi and camera should now be connected to your computer, powered and ready to test!
6. To view the live feed, open Chrome browser window on your laptop or desktop.
Type the following URL into your browser’s address bar:
Allow a few minutes for the Pi to boot up. Now you should see the live stream from your camera.
If you don’t see “Start live feed”, check the cables are connected correctly, click REFRESH on your browser and wait a few minutes. Read through the guide again and give it another go.
That’s it. Now it’s time to place your camera outside and start capturing images of wildlife!
We hope you enjoy the new camera functionality. Let us know about your hacks and what wildlife you spot.
The Naturebytes Team,
P.s. For any advanced camera settings check out this guide for settings adapted from (http://elinux.org/RPi-Cam-Web-Interface)
Credit: The software that provides the camera control interface has been adapted from the brilliant Raspberry Pi-Cam_interface created by Silvan Melchior.
Is there any way to provide power to the unit and obtain a live stream by Wi-fi?
Hi,
Yes you can use WiFI and live stream (the Raspberry Pi A+ will need a dongle), on the Raspberry Pi forum there is lots of advice for this, and this link has more info https://elinux.org/RPi-Cam-Web-Interface
Let us know how you get on!
Hi,
Are you able to either release the code packages or instructions to update the image to support Raspi Model 3B+ or 3A+.
Is it as simple as sticking it in a supported Pi and updating the OS?
Hi Alan,
Yes, here is the link to the resources page where you can find the latest OS. Just download, unzip and write to your SD card.
Thanks,
The NB Team
There is no link in the comment to the latest release. Please can you post the link or update the link in the resources – I’m trying to get my new camera to work on a Pi 3 A+ and it simply won’t boot – it stops on the Rainbow screen. I know the Pi is ok because when I use an SD with the latest stretch Raspbian image date 11/2018 it boots perfectly.
Hi Mark,
Apologies for the late reply, your comment was in our spam folder and we didn’t spot it. There is a Pi3 release on the resources page that we have added to help solve this issue.
naturebytes.org/wildlife-cam-kit-resources/
Kind regards,
Naturebytes
I cannot find the resources page – there is no link in your post?
Hi CW,
The resources page is here – naturebytes.org/wildlife-cam-kit-resources/
You may need to login to access it, but creating an account is free.
I would like to know if I can install Naturebytes Live View Image in raspberry pi2 or in pi3. Thanks in advance
Hi Jesus,
The image has been deployed on Pi model 2 and 3B.
Thanks,
The NB Team
Thanks for everything, well with pi3B, but now, I’m trying to install Liveview on pi3B + and it does NOT boot.
For when do we expect a version in Stretch that works with
Pi3B + ?
I appreciate any information about it in advance.
Have to agree I’m trying to get the camera to work with a Pi 3 A+ and it simply won’t boot with the naturebytes image currently available in resources – this is dated 2016 so totally out of date.
Hi Mark,
Apologies for the late reply, your comment was in our spam folder and we didn’t spot it. There is a Pi3 release on the resources page that we have added to help solve this issue.
naturebytes.org/wildlife-cam-kit-resources/
Kind regards,
Naturebytes
I am still waiting for a short answer, it is not so difficult to attend to the people who have bet for you.
It’s the second request for help that they do not answer, so double disappointment.
Jesús Serrano
Hi Jesus, it appears that one of our spam plugins automatically moved your comments to the spam folder and we didn’t see them. We took a quick look and spotted them quite by chance.
Please email info@naturebytes.org and let us know how you are getting on as we appeciate this image will be quite old now.
Kind regards,
Naturebytes
Hi
Interesting project. I’ve got it working but I want to make some mods along the lines of those I made for the static image kits: mainly to add uploading of images and videos to an NFS share. However, the password has been changed for the `pi` account.
Any chance we could have it? It’s not `raspberry`
Gareth
It’s OK, I got it eventually. `naturebytes`
Thanks Gareth, yes it was changed.
Hi
You need to know how to upload the videos captured with LIVEVIEW.
Impossible to upload them in the “show my photos”, because I have obtained some interesting videos and I would like you to see them.
My camera is very traveling !, This summer was placed in the diverse corners of a mountain farm in Asturias, in the North of Spain.
Specifically in the natural park of “Las Fuentes del Rio Narcea”.
beautiful landscapes and abundant fauna of bears and wolves … but I am satisfied with the small fauna !.
In this video we can see how among the stones of an ancient wall, species such as the Gray Wagtail (Motacilla cinerea), and the male of black redstart (Phoenicurus ochruros), come to capture insect larvae.
My apologies, you had to link to YouTube!
https://youtu.be/k7Tx9pP9dcU
Hi,
Your email addresses are both getting ‘mail delivery’ errors:
shop@naturebytes.org
Info@naturebytes.org
Are these invalid now?
Hi Ian, there shouldn’t be any issues with those email addresses if you’d like to try again.