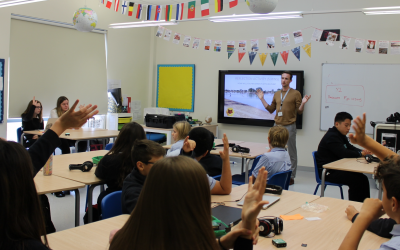
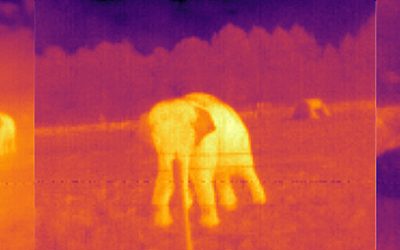
First things first, you’re going to need to charge the battery before you take it outdoors as the batteries are straight from the factory and will need charging before use. By all means, feel free to charge the kit and leave it outside for a few hours if you’d like to skip ahead and confirm that your kit is taking photos. Whilst outside, walk infront of the kit a few times and then 5 mins later, open the case and remove the USB flash drive. Load the drive on your home computer and you’ll soon be able to see if your PIR and camera is working as expected as your USB drive will contain photos that your kit has taken. Once done, place the USB flash drive back in the camera and close the case. It will detect the drive and continue to save photos to it without it needing to be switched off.
Note – your kit won’t have the correct date and time as you haven’t yet set this. To do this, continue reading.
Preparing to test your kit
If you’d like to test the kit thoroughly you can charge and use the kit at the same time, which means you can plug the kit into your HDMI TV or computer screen and turn it on to configure and test it. There are three important factors to take into consideration when testing your kit via the Naturebytes desktop;
1) Your kit loads a Python script at startup which will save and stamp photos with information if the PIR is triggered. This process is CPU intensive for a short period of time, so you don’t want to trigger your camera continously when using the desktop as it will provide a poor, slow experience. Place the camera away from you so you can’t be detected by the PIR and when the desktop boots up, click the “Terminal” icon and write sudo killall python. Press enter and the camera will stop the script that takes photos until it is rebooted (i.e placed in your garden), leaving you to explore the desktop and not have to worry about triggering it by mistake.
2) You can improve the stability of the A+ Wildlife Cam Kit by disabling the preview functionality if you still want to trigger photos to be taken when on the desktop. Watch the Testing your Naturebytes Wildlife Cam Kit video for advice on where and how to make this change.
3) If you are using an external hub (the A+ only has one USB port so this would make sense), removing the USB drive and replacing it when on the desktop can sometimes assign a new drive ID if the USB port is detected as the primary USB device, which means your camera can’t save photos to the standard drive for that session. Just take a note of this, as when deployed in the field this isn’t an issue.
Now you know the three points to watch out for, you can get stuck in and test your PIR and camera by watching the Testing your Naturebytes Wildlife Cam video for a step by step visual guide below. Note – we recommend watching the video at full screen and 1080p HD quality to help read the text.
Configuring the date and time.
Your kit has a Real Time Clock that will save the data and time even when the kit has been turned off. It doesn’t have a date or time associated when it is built at the factory, so we’ll need to tell it the date and time when we connect to the kit. The simplest way to do this it to plug the kit into a HDMI screen and following the three considerations noted above. Once you are on the desktop, click the Terminal icon. You will be presented with a command prompt. Enter the following command and press enter. Note – change the date and time as required.
sudo date -s “04 MAR 2015 13:24:00”
Once you have entered the command above we will next need to save the date to the Real Time Clock using the command below. Write the following and press enter:
sudo hwclock -w
Finally, let’s read the date and time from the Real Time Clock to make sure it has been saved. Enter the following:
sudo hwclock -r
You should see the correct date and time. If you reboot the kit (Pi), it will now remember this new data and time that you have entered.
Register your kit online at naturebytes.org is the first thing I see when I log on.
Where exactly? There are no links to this from naturebytes.org.
Hi Howard,
The form will be up and online in the next 24 hours. We’re a little behind helping our new users, but it will be here shortly for you to register yout specific details.
Hi there,
Have set up my Naturebyte camera that I received a couple of days ago and it all went well. As I have an A+ I changed the script to –nopreview but was still having a problem with the cpu running at 100%
However I disconnected the screen, rebooted and set the camera up to take photos, it seemed to reboot fine. Then I realised I left the usb drive out (it was running via usb hub) so shut down, inserted the drive and switched back on, however now won’t boot.
It does start if i plug into a power supply, but not via the Powerboost. Battery is fully charged, and charges when connected to a power supply.
I assume the Powerboost is not functioning correctly, any idea what I can do now?
Regards,
Ian
Hi Ian,
That certainly sounds like you have a power issue if it starts on mains. Interestingly, the –nopreview issue isn’t present if you provide the Pi with a good mains supply (we discovered when testing the bug) that deliverys 1000mAh so the fact that you had the 100% CPU issue on desktop seems to point to insufficient power getting to your Pi. Email us at info@naturebytes.org and we’ll get you a replacement Powerboost. Note – when not on desktop, the Pi performs as expected in the garden.
Hi Ian,
I can confirm that behaviour of the Pi. First time this happened I was afraid I had corrupted the image. Have had this in past several times, especially with the Wheezy images (might be that I’m more careful these days). The SD card did boot up properly in another Pi (Pi3) so it wasn’t a FS/boot image corruption thing. Reentering in the A+ showed proper boot up after that. When it happened again, I had it resolved by removing and then reinserting the SD card. No clue why this would work, but it could have to do with improper shutting down of the Pi.
I’m seeing very similar behaviour to Hendrik-Jan.
It’s a Model A+ with an active USB hub connected and the keyboard, mouse and USB storage connected to that, so no power issues.
The processor spends a lot of time at 100% even when idle. When I ran the tests, they passed OK, but when I rebooted and passed my hand in front of the PIR, a photo was taken but then the processor stayed on 100% and everything locked up: UI not updating, keyboard and mouse non-responsive.
Gareth
Incidentally, your video doesn’t cover how you will connect keyboard and mouse to a A+ to do the testing: it goes straight in assuming they are connected somehow. It might be a good idea to add this for those with very little experience with the Pi.
Hi Gareth,
Many thanks for your comment. That’s correct, we found a bug with the A+ when in desktop mode that you can correct with a software change as seen in the video. If you point the camera away from you, or disconnect the yellow jumper cable so it doesn’t trigger, you can then follow the video without causing and CPU spikes and make the change in the nbcamera.py script by adding –nopreview. We’ve tested it here on battery with the change and it prevents the issue.
Thanks too for the A+ feedback i.e it only has one USB drive. I was using a hub, but we will add a tutorial to explain why it’s useful. We have also had a few users plug their HDMI out into laptops, so we need a little tutorial about using the Pi in general really (or we will link to a few online) to help beginners.
Let us know how you get on.
OK, re the bug, but there is something very strange going on.
To try to eliminate some variables, I reverted to battery power, removed the HDMI cable and replaced the hub with a Raspberry Pi wifi dongle. I then logged in over SSH.
Response was very slow: fast initial response to confirm the SSH key, but then 10-20 seconds to login. I suspected high CPU load, but no. uptime showed very low CPU occupancy.
Despite this, there was very poor response to key strokes. It would echo the first couple of characters in a command and then wait 10+ seconds before echoing the rest. auto-complete didn’t work either.
I killed the camera process but this made no difference. I don’t think it’s the WiFi as the Pi was within 5m of the hotspot.
Has the Pi been set to sleep in some way?
I did manage to run top to get an overview of what was happening, and when the PIR was triggered, the wa statistic went to over 80% for a long time. And that’s with images being saved to the system disk as the USB drive is not plugged in.
Has anybody seen anything similar?
Gareth
Hi Gareth,
Run the exact same test using your mains adapter and see what you get. If you get improved speed we can start to factor in the power issue variable. Also, run sudo crontab -e and # the python script from starting up at boot and repeat it and observe any changes. Lack of power seems to be the key, as the WiFi dongle will be using a certain amount too. The slow response time with no CPU load seems to suggest the same, but we can investigate and look deeper.
Note too – when the bug / issue was noted, we tested the exact same SD and physical setup on a B+ Pi and found that issue resolved, so it may be very specific to the A+ and even firmware related that we may need to update.
OK, connected external power supply and powered hub with kbd, mouse and wifi dongle. commented out the crontab line and rebooted.
zero cpu. Desktop terminal screen runs no problem or delay.
SSH performance still very poor. Logs in quickly but then delays 10 seconds before echoing command and executing it.
I’ve never seen this behaviour before. I was running top on the desktop and could see nothing toward. Ergo, it’s not a PSU issue.
To delve further I created a 100MB file on my Mac and then scp’d it to two PI’s. one is a B+ and the other is the A+ in the camera. To compare I then scp’d the same file from the A+ to the B+.
I got 5MB/s throughput from Mac to B+ 1.2 MB/s from Mac to A+ and from A+ to B+. They have the same dongle in them. Ergo it’s not a network issue.
I’m going to run a system update in case there’s something dodgy in the A+’s SSHD.
Gareth
Update to the above. I think the problem is the lack of memory on the A+.
It’s running apt-get dist-upgarde right now and the processor is maxed out on 100% with most of the time (+60%) waiting for IO completion. Basically, it’s swapping like crazy.
Maybe the A+ is not powerful enough to run an SSHD. I other words, I’m trying to get it to do something it’s not meant to do.
Gareth
Hi Gareth,
After a little investigation we’re concluding the same. The –nopreview change was saving RAM, hence stability was improved. It’s possible to assign memory to the GPU using raspi-config so I may log the usage. This explains why the B+ doesn’t have any issue when in Desktop vs the A+ and its 256MB. Funnily enough, a 512MB version is due for release in 10 days time.
We’ll report back once we have experimented.
Hi Gareth,
with regard to your comment: “And that’s with images being saved to the system disk as the USB drive is not plugged in”, did you also change the code to direct saving to the SD card (i.e. system disk)?
Haven’t tried the A+ in desktop mode, but I did use the official RPi WiFi dongle and it works well. It has a good signal, much better than some of the other cheap WiFi dongles I’ve used. It’s true that there is bit of a lag, but I see that with some of my more powerful Pis as well (usually access cabled because of this issue). The lag might be slightly more on the A+, but I guess SSH may be CPU bound.
Having said that, I’ve found WiFi connection very stable, even outside, at 12-15M from WiFi router I could have pictures streamed back at reasonable speed over SSH. To put that in perspective, at that distance every other device I have stops connecting to my router. The only issue I’ve found for performance was with the I/O on the USB stick, as I’ve reported before. But I’m now doing all I/O directly to SD card which speeds things up tremendously (and I’ve removed the step of adding the NB logo as a standard thing – for the little movie NB put up I had that put in afterwards on my Ubuntu box which was done in split seconds for all those pictures – the A+ is just not a powerhouse).
But the impressive thing with the A+ is power use. 40 milliamps idle, and just ~80-90 mA under full load is impressive (my Pi3 can go as high as 400 or more with peripherals!). It will very briefly spike to ~130 mA when the camera is active. Adding the WiFi dongle adds ~50 mA, so in headless mode, with WiFi dongle, the A+ should not go beyond 200 mA, so powering from the battery should be fine, unless you want to add more peripherals than just WiFi into the case.
OK, some further info.
I used a USB powermeter to confirm that Amperage is not the problem I am seeing. I didn’t try with an HDMI attached, but with WiFi and convert running over SSH, I see a max of 220mA: well within the 500mA limit of the Powerboost.
However, what I see with top running is a distinct lack of memory on the A+.
With just SSH running and no WiFi there is only 16MB free. With WiFi running this reduces slightly. When convert is running, the processor spends most of its time in WA (i.e. waiting for IO to complete).
To remedy this for my purposes and to add a few features, I’ve made the following changes:
Changed to multi-user rather than graphical (no lightdm saves another 14MB memory)
mod the script to save work in progress to /tmp
mounted a NFS volume and move the final image to there rather than on USB drive
Send a thumbnail over PushBullet to my mobile devices so I can see when a picture is taken.
This will reduce battery life so I’ve added the mod to capture battery state and use PushBullet to let me know the battery is about the die nd the shutdown.
I am seeing problems which I think is with the power supply.
I initially charged the battery while powering the PI, changed the python script for the A+ 100% problem and all tests worked well, including taking pictures in the garden.
But this morning nothing happens when I switch it on. The yellow light shows when a charger is added but this never goes green. If I plug the charger into the Pi it all works well.
Is there an issue with the Power supply?
Hi Terry,
The battery will take 17 hours to charge to full, so it isn’t quick unfortunately. Give it a charge over night and confirm that you get to green. Is the red LED showing when you turn on?
Hi, I see no red LED. I have charged the battery all night and still see no green LED but the battery shows 4.13V which I guess is from my original all day charge.
The PI still will not start from the powerboost but still starts just fine with the mains charger directly connected to the PI.
Cheers,
Terry.
Hi Terry,
If you haven’t already, drop us an email at info@naturebytes.org and we’ll send you a replacement Powerboost.
I am having a similar problem, the Pi will not power from the PowerBoost, but it appears to have charged the battery (LED did go to green). Also, is anyone else’s grommet/bung warped?
Hi Sam,
We’ve had a few people report working Powerboosts (LEDs show correctly and the battery charges etc) yet the switch itself doesn’t power on the unit. We think the switch may be at fault in these cases. We’d like to send you a replacement Powerboost (with switch) and a pre-paid return envelope so we can get your Powerboost back with the bad switch. Can you get in touch with us at info@naturebytes.org
We’ll also pop a new grommet in the same envelope as we wouldn’t want and water ingress due to a warped one not sealing the back of your kit correctly.
Many thanks.
I blew up my Powerboost 500C that came with the Cam, largely my own fault. This part was a bit flaky in behaviour even prior, including failures to start up and erroneous low voltage indication (red light). Bought a replacement unit from a local vendor in The Netherlands, but this part is clearly also faulty. To begin with the output voltage was way too low (~4V), and then it stopped working altogether (no output voltage, no blue light). And that was even without soldering on the switch (which is a nice feature but not strictly needed). Maybe something wrong with a batch of these things? Might be sensible to send all faulty parts back to NB and contact AdaFruit for further diagnosis. I’m going to send my new part back to the vendor anyway, see that I can get a replacement. I also have tried two Powerboost 1000C, which seems much more stable.
Hi Hendrik,
That is interesting. So far we seem to have had the switch fail vs one or two Powerboosts which look to have failed (out of 300 sent) but what you have just noted is quite intresting to us. Do you have a batch or serial number of the local 500 C you purchased?
I had a Powerboost go flaky on me as well.
I ‘halt’ed the A+ remotely and then opened the case. When I switched the Powerboost Off the switch started smoking.
I yanked the battery off before any damage and it still works. However it seems there is a problem in there somewhere. I’ve got some 1000C’s on order for when I though the issue was Amperage
Gareth
Hi Gareth,
We’ve had ~10 Powerboost 500 C’s fail on users so far, which is suprisingly high so we are in touch with Adafruit to look at the issue. It seems to be related to a transistor literally burning, as the general feedback points to “smoke from the switch”, yet one user reported the smoke was from a transistor nearby that we are trying to identify. We’ll drop you an email.
I have fixed the switch, I sent an email regarding the grommet.
The Powerboost 500C seems to on the low end quality wise I have had the wildcam up and working for a couple of weeks. After the last charge I tried to power it up today and I only got smoke (quite a lot though) . Is there a replacement policy for the Powerboost?
Hi Olof,
Yes, we’re actually swapping out damaged Powerboosts for a new replacement unit from Adafruit for users when this happens. In the future we’re going to use a different board (Seeed’s LiPo Rider looks good).
Send us your address to info@naturebytes.org and we can arrange that for you.
Kind regards,
Naturebytes
What is the thread size of the brass bush at the bottom of the case?
Hi Derek,
I have passed this to Jon @ Naturebytes who will be able to inform you when the workshop opens tomorrow (Sunday today).
Hi,
Thanks for the kit – looking good.
I tried to set the time but when I ran the command “sudo hwclock -w” I got the error
“hwclock: Cannot access the Hardware Clock via any known method”. Any suggestions?
Hi Jono,
Thanks for getting in touch. Can you confirm that you’re using the A+ Raspberry Pi? If you’ve got the real time clock placed correctly (confirm by double checking in the instructions) then you may have a faulty clock. Let us know if it is the A+, and if it does look to be placed correctly on the pins then we’ll send you a replacement clock out in the post.
Hi,
I’m having the same problem with an A+
I have connected the RTC as shown in the instructions ( over pins 1,3,5,7 and 9)
Hi Richard,
Take a look at Hendrik-Jan’s response above, he’s exactly right. The same image on the SD card was cloned for everyone (using an A+) so the only difference in it not working is most likely a user fitting it incorrectly (which doens’t look to be the situation in your case) or an issue with the clock itself. I wouldn’t mind sending you a new one so you can swap it out and confirm that that’s the case. We’ll get one in the post to you tomorrow if that’s OK?
Hi again,
do you need my address?
Hmmm. It seems I’m using a Pi 2 Model B… guessing that might affect things…? Sorry – I’m not well-versed in the differences between models.
Hi Jono,
can you confirm that you’re using the official SD card provided by NB? The RPi 2B has the same GPIO layout as the A+, so in principle should work if you follow the exact instructions – however finding the correct point of reference on the GPIOs can be confusing, make sure that on the Pi2 the RTC is located away from the USB ports, so not close to it. The RTC needs to cover the 3.3V, SDA, SCL, CLK0, and GND pins, for reference, so in case you’re not certain google for the pin layout. I can try whether it works on my Pi2B tonight, could be that a firmware update on the SD card is needed but normally you can simply swap out cards to any model and it works (perhaps not with the earlier versions with 26 pinouts).
As a question to the NB Team, I’d like to know if the image of the SD card can be downloaded somewhere? With tinkering of users some systems or configurations might break. Although making an image of the SD card itself is straightforward enough, its something I would only like to do in case I corrupt something, because otherwise it just eats up space somewhere, either on disk or on a spare card. It might also save you time and money because you could just direct users that are experiencing problems to download the official image again, or, in time, provide upgraded images that way.
Hi,
Yes – I’m using the official SD card. I’ve checked and it looks like I’m in the correct pins. If you are able to check that it works for you that would be fab.
Thanks.
Hi Jono,
had the RTC tested on my RPi2B, with the NB SD card. The RTC was recognized properly, any ‘hwclock’ commands checked out properly without error. Also i2c address 68 was present and in apparent use (‘UU’). I was suspecting perhaps some differences in device trees or some other difference between the different chipsets of the A+ vs the 2B to be present, but apparently this is not an issue. This would also suggest that it is not affected by firmware updates etc, since, afaik, firmware resides on the SD card.
However, when I removed the RTC, (well, in proper order, switch of Pi, remove RTC, boot), it then showed the exact error message you initially reported. Given that you seem to have put the RTC on the correct position, this very strongly suggest the device you have doesn’t work properly.
Btw, I was wrong in my earlier assumption that NB selected the DS1307 chip for the RTC. It is in fact the DS3231, which reportedly is more accurate but uses the same hardware address and same drivers/kernel modules. Interestingly, the chip does have a built-in temperature sensor. Accessing that sensor would be fun to do some rudimentary environmental monitoring during observations. There is some information on how to do that in this forum:
https://www.raspberrypi.org/forums/viewtopic.php?f=37&t=59808
Registers 0x11 and 0x12 should have that information, and there is even a bit of Python code how to convert to temperature. However, this doesn’t appear to be working since the device is inaccessible since it is already being accessed by the rtc kernel module (hence listed as ‘UU’ when probing the i2c devices). I get:
Error: Could not set address to 0x68: Device or resource busy
Would there be any other way to get the temperature of the RTC? Indirectly somehow from information passed on to the kernel module? I’ve looked at the temperature reporting (/sys/class/thermal/ etc) and in rtc_ds1307 reporting (/sys/module/rtc_ds1307/drivers/i2c\:rtc-ds1307/1-0068/rtc/rtc0/) but seem to be unable to find it there.
From a bit of digging, I’ve inferred that the NB Cam must use the rtc-ds1307. At the terminal, what does it show when you do:
sudo i2cdetect -y 1
It should show ‘UU’ at hardware (hexadecimal) address 68.
I’m guessing the NB team managed to find a cheaper version based on the same chip as in this tutorial:
https://cdn-learn.adafruit.com/downloads/pdf/adding-a-real-time-clock-to-raspberry-pi.pdf
Congratulations on a beautifully designed piece of kit and generally clear instructions for assembly and testing. Everything worked fine first time on mains power, now just waiting for the batteries to charge.
A couple of comments on the V1 instructions, although I expect you already noticed them:
– it was disconcerting that the pictures showing the main insert do switch between the cut-out I received and a different version. I don’t know if that different version was an older prototype or if the different versions are for different R Pi models, but it would be good to sort that out and make it clear.
– in several stages of the assembly, the number of screws needed is wrongly shown as 3 instead of 2.
– the vertical orientation of the PiR on page 12 is wrong on the RH picture.
– typo on p 39, I’m guessing ‘glaze’ should be ‘glare’
– somewhere e.g. on p25 or 36 it would be good to give a rough indication of how long battery charge might last ‘in the wild’, even if very broad range
Thanks Peter,
We have taken your comments on board and are now working to update the instructions at the moment.
thanks 🙂
Any further work on a quick write-up to install a proper low voltage power-off sequence? I have backed up my SD card since there doesn’t appear to be a site published to download a new .img file.
Hi Sam,
You can download the Kickstarter image (with the –nopreview fix included) here:
http://naturebytes.org/downloads/imgs/ks_release103.zip
Thank you! Much much faster on a Pi2B.
Any further work on a quick write-up to install a proper low voltage power-off sequence? I have backed up my SD card since there doesn’t appear to be a site published to download a new .img file.
What is the thread size used on the bottom of the case? It doesn’t appear to be a standard tripod thread (1/4-20).
It’s an M6 – 6 mm metric thread.
Do you know which pitch? Coarse (1,0) or Fine (0,75)?
My clock and photo timestamp kept reverting to GMT although I had entered the correct time BST per the instructions. If you are based in UK and have the same issue:
– on the desktop go to Menu/Preferences/R Pi Configuration/Localisation
– click Timezone button and select GB, then follow the steps on page 40 of the assembly instructions v1 to set BST.
For all of you working through very slow write times I have some really good news. The Pi A+ is not the limiting factor, it is the Kingston USB memory device that was added last minute. It has horribly slow write times. I have gone from 2.5 minutes per photo to ~17 seconds by replacing with a $4 USD 8GB stick from MicroCenter.
Hi All, thanks for producing the camera kit, I can imagine the hours of dedication required to get it finished!
Couple of things
My powerboost has died, I think. When I powered the unit on after it’s initial charging period, I saw a wisp of smoke (not typically a good sign) from the board, just alongside the switch. All seemed to be working, so I left it and carried on, assuming it was just some solder flux burning off the board (!). After the battery went flat, I connected the USB PSU and left it for 24h+ (with the Pi disconnected and powered separately). Orange light remained on, no green light. Battery flat (3V) when tested on another device with battery voltage detection.
Setup: Pi B with WiFi adapter.
Python code: Is this shared on bitbucket / github or somewhere similar? I’d be interested in contributing improvements if so.
regards
Mike
Hi Mike,
We’re just emailed you privately, but look out for a general Powerboost update to all users as we have identified the issue and have advice for everything moving forward.
Does the kit’s clear “lens” covering the camera function additionally as a close-up diopter adjustment?
Hi Sam,
The lens on the case shouldn’t. The camera itself has a fixed factory focus of 1 metre, so we designed our bird feeder arm to hold the feed at this distance and selected a lens material that provided a clear photo at this default distance.
Hi,
Just wondered if there was any news on the community site? I am interested in some of the projects people are working on and the mods to the kit. I would like to write a powerdown script for low battery (which could also fire an email), I know I need to connect the “white” wire, but am also aware I will need to put a diode in… so perhaps the forum could be a place for community engagement including how to’s etc. It might also remove some of the pressure from the core team who must be exhausted by now!
Thanks
Michael
Hi Michael,
Our exact plans entirely. We’re gearing up to release our forums shortly. The Powerboost issue saturated our resources, which has been rather annoying as we didn’t expect the switch issue to crop up but we are clearing that and getting back to the core features to support your kits.
We would love for you to submit your script / images too. We will post our Github details shortly, but also take a look at this community image by Richard Haylor if you want to speed up capture and run a “lite” flavour
http://richardhayler.blogspot.co.uk/2016/05/naturebytes-lite-bare-bones-build-for.html
Sent you guys an email with this a week ago, but didn’t get a response, so going to ask here too:
How can we confirm if we are suffering from the powerboost problem mentioned in your recent post?
I see no visible damage, but I think our unit is behaving oddly.
When the switch is off:
With no USB plugged in, green is always on (dimly).
With USB plugged in, orange and green are always on, with no change even if left charging overnight.
When the switch is on and USB is not plugged in:
Blue, green (dimly) and red are both always on.
Orange comes on and green gets brighter if USB is plugged in.
Last time we set up the camera (after charging overnight) it powered off after one shot. So I’m thinking the powerboost isn’t charging the battery.
Your thoughts?
Hi David,
Thanks for getting intouch via the website. Apologies if we missed your email. It certainly does sound like your charger chip on the board has failed (this is the chip that smokes and has been the raw cause of the Powerboost issue failing). The Powerboost will still continue to operate in many cases, except it won’t charge a battery any longer. Because you charged and then got one shot, I would say that yes, you need a replacement Powerboost from us. Can you drop us another email and we’ll get that arranged for you? Your new Powerboost won’t hvae a switch this time.
Kind regards,
Naturebytes
Hi there. I fear that my powerboost has packed up. Although it did initially charge the battery ok, and I have removed the switch I think the damage had been done. I’m not sure that it is charging now.when I unplug the A+ and plug in the batter and a charger the leds are showing yellow and green immediately and one component on the board (an integrated circuit immediately behind where the switch was is getting extremely hot, so I don’t think it is safe to leave on. If I have the usb charger on and the battery is removed it doesn’t heat up. With the switch removed it won’t drive the model A+ Can it be replaced please?
Hi Robin,
Thanks for the update. We’ve just got in touch via email to get your a replacement, so look out for that.
Kind regards,
Naturebytes
wehre can i find the stl files i Need to Print for my kit? quite a bad website with information distributed all over the place. is there a forum?
Hi Bernd,
We emailed you the STL link on the 9th June and again today, but just incase this is an email issue – here is the direct link to the STL files:
http://naturebytes.org/downloads/naturebytes_wildlife_cam_kit_STL_v1.zip
Kind regards,
Naturebytes
After wasting over an hour trying to get the A+ included with my kit to work with the USB hub I use every day with laptop, so I could use a keyboard and mouse with myUSB drive (each worked if I plugged them in directly) I gave up and installed a Model B I had lying around.
Is this going to have a big affect on battery life? Is there some magic to getting the A+ to work with a hub?
Hi Eric,
There shouldn’t be a difference in terms of your model B working with your hub vs the supplied A+. Can you confirm that the hub works with your model B, and is it a powerered hub (i.e powered independently via a wall adapter)?
Kind regards,
Naturebytes
I just saw this: I assumed the point of taking my email address for a comment was telling me if I get a response!
Yes, it is a powered hub, and swapping the Pi is what fixed the issue.
Hi Eric,
That’s good news. Would you like us to replace your faulty Raspberry Pi?
Kind regards,
Naturebytes
Have you determined the root cause of the Power Boost failure? I have removed the switch, but it is inconvenient to use without it. Would connecting the switch with a cable help?
Hi Dean,
We’re still working with Adafruit to identify the exact cause, however we know that it is directly related to the switch and that it’s shorting the board which is damaging the charger chip (randomly during power on / off). You may want to try the Anker 10,000mAh external battery pack (https://t.co/i8nKSDXg1z) as another alternative, as you could disconnect the power to the pack whilst we investigate the Powerboost issue.
Kind regards,
Naturebytes
Is it possible to replace the camera with the noir version so that I can use it at night?
I notice that my USB stick isn’t always mounted om /media/usb0. So when I remove the USB stick, it doesn’t contain any pictures.
Is there a way to force the mount tot /media/usb0?
Hi Erwin,
Thanks for getting in touch. Apologies for the late reply, we didn’t spot your comment. A move to a dedicated forum to handle support is planned to help make the process smoother. In regards to your issue – on boot we run automount, a programme that will automatically mount any attached USB drives and provide /media/usb0 as the default location. If you boot to desktop, can you confirm that you see /media/usb0 and can write to it? If not, then drop us an email as info@naturebytes.org and we can assist you further.
Kind regards,
Naturebytes
This issue seems only to occur with a different USB stick then the one provided.
Another question: What did you do with the original USB stick so that writing to it, doesn’t give an error. I get permission errors when I use another USB stick, even when I uncomment “perms” line in the script.
A (support) forum would be nice (-:
Hi Erwin,
You may want to confirm that the other USB flash drives you are using are formatted to FAT32. Could you confirm? More information here looking at issues with NTFS drives (http://raspberrypi.stackexchange.com/questions/41959/automount-various-usb-stick-file-systems-on-jessie-lite).
The permission error is due to the original Kickstater image mounting the drive as a user with different permissions, so when your images are saved you can access them on your PC but you can’t delete them etc… as required. We fixed this in the update that’s available on the resources page (PIXEL image). Alternatively, you can make the edit yourself by editing /etc/usbmount/usbmount.conf – to do this you can run “nano -f /etc/usbmount/usbmount.conf” from the command line and then change the user to pi:pi instead of root. I would advise running the PIXEL image however as there are various other fixes such as speed improvements that will also offer a better experience.
Kind regards,
Naturebytes
Hi all,
Bought the kit a few weeks ago and I have some questions, mainly about the PIR.
Firstly when putting the kit together I noticed that the PIR is pressed hard against the case and makes the white plastic bulge out a bit – I presume this is correct?
Secondly the PIR seems to be very sensitive and is going off all the time even in the pitch black. Do you think this could be related to the above?
Finally, in the camera box there was a white plastic disc but this isn’t mentioned in the instructions and I can’t find it listed as included with a Pi Camera. Can you tell me what it is for?
Thanks for any help you can give me!
Caroline
Hi Caroline,
Thanks for getting in touch. It sounds like your PIR has been set to be too sensitive from the factory if it’s triggering without and changes / waving your hand in front of it. It’s possible to change the sensitivity, but if you want to contact us at info@naturebytes.org we’ll walk you through the process. A note for us too is to provide a guide showing users how to do this on the FAQ page, so we’ll start work on that too.
The disk will most likely be for changing the focus of the camera. Some of the camera boxes contain focus discs in case you need to.
Kind regards,
Naturebytes
Hi,
Thanks for replying and for all the help – I’ve just emailed you about the PIR sensitivity and will look into how to use the focus disc.
Caroline