We’ve released an update for your Wildlife Cam Kit software to close a few bugs we found in the first release (Kickstarter). Below, we explain what you need to do to get these improvements on your cam kit. Check out the change-log at the bottom of the page for the full list of the fixes and improvement.
Additionally, we’ve updated the image file (the operating system that runs your kit) so you can all enjoy using the new PIXEL OS (released by the Raspberry Pi Foundation) when you’re checking your Cam Kit photos on the lovely new desktop.
GPIO pin change
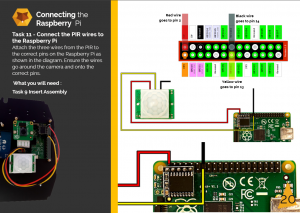
There’s one important change that you’ll need to make if you want to use the new software. We’ve moved the positioning of the jumper cables along a notch to fix an issue where the RTC (Real Time Clock) module can block the adjacent pin.
We’ve taken a page out of the latest instruction manual below to show you the new placement below, or login and take a look here.
It turns out that the manufacturing process of the RTC unit isn’t quite spot on each time and the RTC plastic casing can be offset by a few mm – enough to prevent some users from pushing the jumper cable onto the pin next to it.
Download the image file
Right then. To download the latest image, pop along to our download pages and grab it. If you’re unsure how to load the image file onto your SD card then you can find enlightenment by taking a look at our instruction guide showing how to format and write the new image to your SD card. You’ll need an SD card reader handy although most newish laptops have them built-in.
As always, feel free to contribute via our Naturebytes Github account. We’ve recently had a commit from DeviantSaker who has added the ability to select the location where you photographs save. A great addition we thought. We’ll certainly include it in the new release, or if you want to try it out just grab the python script from GitHub and use it right away.
Enjoy!
Al
Co-founder, Naturebytes
Change-log for Software Update:
– Fixed a delay writing to the attached USB flash drive. Images are now written in 1 – 3 seconds (it took up to 60 seconds in some slooow cases).
– Removed the stamping of photographs by default. You can still turn it back on in the code if required.
– Code optimisation (see our GitHub for the very latest improvements)
– Updated the operating system to PIXEL
– Changed the physical GPIO pin to prevent the RTC (Real Time Clock) from blocking the adjacent pin
– Included milliseconds in the filenames to prevent a possible issue where two images are saved within a second (thanks to Richard Keed for suggesting this)


I’ve submitted my code in GitHub. Nothing special, it still needs work and I’ve probably placed it in the wrong place!
I like the Naturebytes logo on the photos, in fact, if you have any more I would love to give my cameras a unique image each and a different one for when in IR mode.
So is this update the same version as: “Release date 20/12/16 | Version 2.11”?
Hi Erwin. Yes, the latest image to download is this one below. If you want a few community developed features, then check out https://github.com/naturebytes/Naturebytes-RaspPi-Dev/blob/master/Pixel/Scripts/nbcamera.py
http://naturebytes.org/downloads/imgs/naturebytes_211_pihut.zip
Is the 211 software image still the latest version to download or do you now recommend the Live View package (http://naturebytes.org/live-view/) instead?
My wife bought me a kit for Christmas and I came here looking for advice, but it is eerily silent around here and there have been no github commits for couple of years now against your project.
Hi CW,
There is a Pi3 release that is the latest. This works for all Raspberry Pi 3 devices.
You said: “If you’re unsure how to load the image file onto your SD card then you can find enlightenment by taking a look at our instruction guide showing how to format and write the new image to your SD card.”
Where is this “instruction guide”? I’ve looked in the Naturebytes_Wildlife_Cam_Kit_Instructions_Gen2.pdf and in the Naturebytes_Wildlife_Cam_Kit_Instructions_AplusPi1_101.pdf. I found nothing there to show me how to format and write a new image into the SD card.
Hi Frank,
Clear and simple guidance on installing the operating system image can be found here.
Sorry for for the mix up and good luck!
The naturebytes team
Hi team, great product! Enjoying it immensely. Here are some more questions for you:
1) Why is VNC disabled in your version of Raspbian Stretch? I am not able to turn it On or Off in the Raspberry Pi Configuration Interfaces. Can I just reinstall it from the command line? Will I interfere with your setup in any way?
2) Can I safely change the hostname to naturebytes (for disambiguation purposes) without messing any of your scripts?
3) Finally, is it possible to be superuser in your version of Raspbian Stretch? I noticed you changed the default password for user pi.
Thanks!